Core Concepts: Builders & Layout
PicTex provides a powerful visual composition tool built on CSS Flexbox principles. This guide introduces the core concepts of building and arranging elements.
Everything is a Builder
In PicTex, every visual piece you create is a Builder. There are three main types:
- Content Builders: These are the basic building blocks that hold content.
Text(): For displaying text.Image(): For displaying raster images.
- Layout Builders: These are containers that arrange other builders.
Row(): Arranges its children horizontally.Column(): Arranges its children vertically.
- Root Builder:
Canvas(): The top-level container that holds your entire composition and defines global styles.
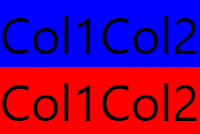
You can nest these builders to create complex layouts. For example, a Row can contain a mix of Image and Text builders.
from pictex import *

composition = Row(
    Column(
        Text("Col1").background_color("blue"),
        Text("Col1").background_color("red")
    ),
    Column(
        Text("Col2").background_color("blue"),
        Text("Col2").background_color("red")
    )
)
Canvas().render(composition).save("introduction.png")
Layout Builders: Row and Column
The real power of PicTex lies in how you can arrange elements inside Row and Column containers.
Main Axis and Cross Axis
Every layout builder has two axes:
- Main Axis: The direction in which children are placed. For Row, it's horizontal. For Column, it's vertical.
- Cross Axis: The axis perpendicular to the main axis. For Row, it's vertical. For Column, it's horizontal.
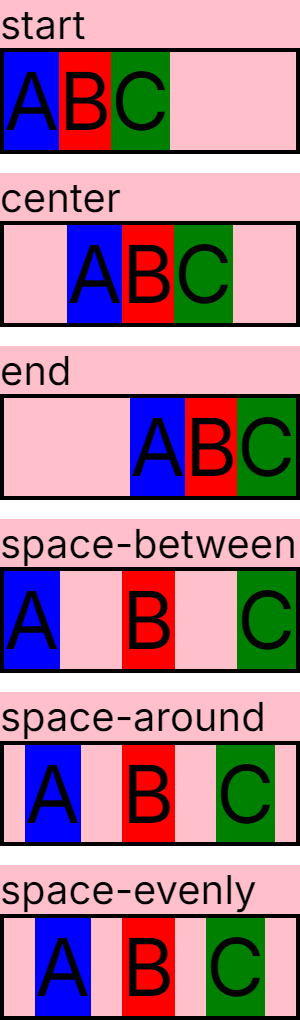
Main Axis Distribution with justify-content()
The justify_content() method controls how children are distributed along the main axis (horizontal for Row, vertical for Column). This follows the CSS justify-content property.
Available values:
- 'start' (Default) - Items packed at the start
- 'center' - Items centered
- 'end' - Items packed at the end
- 'space-between' - Space distributed between items
- 'space-around' - Space around each item
- 'space-evenly' - Equal space everywhere
See the MDN documentation for detailed value descriptions.
from pictex import *

def create_distribution_example(distribution):
    row_with_distribution = Row(
        Text("A").background_color("blue"),
        Text("B").background_color("red"),
        Text("C").background_color("green"),
    ).justify_content(distribution).border(4, "black").size(width=300)
    return Column(
        Text(distribution).font_size(40),
        row_with_distribution
    ).background_color("pink")

distributions = [
    "start",
    "center",
    "end",
    "space-between",
    "space-around",
    "space-evenly",
]
examples = []
for d in distributions:
    examples.append(create_distribution_example(d))


image = Canvas().font_size(80).render(Column(*examples).gap(20))
image.save("distribution.png")
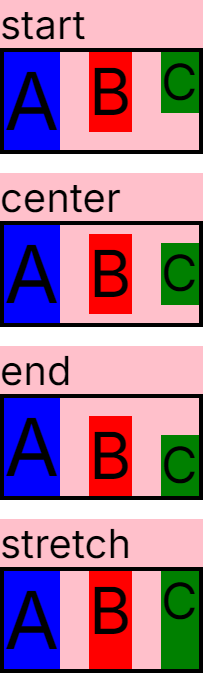
Cross Axis Alignment with align-items()
The align_items() method controls how children are positioned along the cross axis (vertical for Row, horizontal for Column). This follows the CSS align-items property.
Available values:
- 'start' (Default) - Aligns children to the start
- 'center' - Centers children
- 'end' - Aligns children to the end
- 'stretch' - Resizes children to fill the container
See the MDN documentation for detailed value descriptions.
from pictex import *

def create_alignment_example(align):
    row_with_alignment = Row(
        Text("A").background_color("blue").font_size(80),
        Text("B").background_color("red").font_size(65),
        Text("C").background_color("green").font_size(50),
    ).align_items(align).border(4, "black").gap(30)
    return Column(
        Text(align).font_size(40),
        row_with_alignment
    ).background_color("pink")

aligns = [
    "start",
    "center",
    "end",
    "stretch"
]
examples = []
for a in aligns:
    examples.append(create_alignment_example(a))

image = Canvas().font_size(80).render(Column(*examples).gap(20))
image.save("alignment.png")
Positioning: Breaking Out of the Flow
PicTex provides several methods for positioning elements outside the normal flex layout flow. When you position an element, it's removed from the flow and other elements behave as if it isn't there.
Anchor-Based Positioning with .place()
The .place() method positions an element at specific coordinates using anchor points relative to the canvas viewport (similar to CSS position: fixed). This is a convenience method that internally uses fixed_position() and translate() to provide intuitive anchor-based placement.
from pictex import Canvas, Row, Text

background = Row().size(width=300, height=200).background_color("lightblue")
badge = Text("SALE").background_color("red").color("white").padding(5)

result = Canvas().render(
    background,
    badge.place("right", "top", x_offset=-10, y_offset=10)
)
result.save("badge_example.png")
![]()
Supported anchors:
- Keywords: "left", "center", "right", "top", "bottom"
- Pixels: place(50, 100)
- Percentages: place("25%", "75%")
- Offsets: place("right", "top", x_offset=-10, y_offset=10)
Supported Positioning Modes
PicTex supports three CSS-compliant positioning modes, each with different behavior:
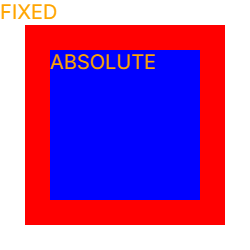
1. absolute_position() - Parent-relative Positioning
Similar to CSS position: absolute, positions the element relative to its nearest ancestor.
2. fixed_position() - Canvas-relative Positioning
Similar to CSS position: fixed, positions the element relative to the canvas viewport, regardless of parent position or nesting.
from pictex import Canvas, Text

(
    Canvas()
    .margin(25)
    .padding(25)
    .border(25, "red")
    .background_color("blue")
    .size(200, 200)
    .font_size(20)
    .color("orange")
    .render(
        Text("FIXED").fixed_position(top=0, left=0),
        Text("ABSOLUTE").absolute_position(top=0, left=0)
    )
).save("position.png")
3. relative_position() - Flow-relative Positioning
Positions the element relative to its normal flow position (where it would naturally be placed by flexbox).