Styling Guide: Text & Fonts
This guide covers all options related to fonts, typography, and text decorations.
Font Family, Size, Weight, and Style
You can use system-installed fonts by name or provide a path to a .ttf or .otf file.
from pictex import Canvas, FontWeight, FontStyle

# Using a system font
canvas_system = (
    Canvas()
    .font_family("Georgia")
    .font_size(80)
    .font_weight(FontWeight.BOLD)
    .font_style(FontStyle.ITALIC)
)

# Using a local font file
canvas_local = Canvas().font_family("assets/fonts/Inter-Variable.ttf").font_size(80)
Font Fallbacks and Emoji Support
One of PicTex's most powerful features is its automatic font fallback system. If your primary font doesn't support a specific character (like an emoji ✨ or a symbol →), PicTex will automatically search through a list of fallback fonts to find one that does.
This means you can render complex, multi-lingual text and emojis without worrying about missing characters (often shown as □).
How It Works
The fallback chain is:
1. Your primary font set with .font_family(), or the bundled Inter Variable font if none is specified.
2. Any custom fallback fonts you provide with .font_fallbacks().
3. Automatic system font discovery: PicTex automatically find a system font that supports the grapheme being rendered.
If a provided font is not found, a warning message is displayed and the font is ignored.
Note: PicTex includes Inter Variable as a bundled default font. This ensures consistent rendering across all platforms, including environments like Google Colab where system fonts may be unavailable.
Providing Custom Fallbacks
You can specify your own list of fallback fonts. This is useful if you are working with multiple languages and want to ensure a specific look.
from pictex import Canvas

# A font that doesn't support Japanese or emojis
primary_font = "Lato-BoldItalic.ttf"

# A Japanese font
japanese_font = "NotoSansJP-Regular.ttf"

canvas = (
    Canvas()
    .font_family(primary_font)
    .font_fallbacks(japanese_font)
    .font_size(80)
    .color("olive")
    .padding(20)
)

text = "Hello, 世界 ✨"
canvas.render(text).save("font_fallback_example.png")

Variable Fonts
PicTex has support for Variable Fonts. If you provide a variable font file, it will automatically apply the weight and style settings to the font's variation axes (wght, ital, slnt).
from pictex import Canvas, FontWeight, FontStyle

# Using a variable font file and setting its axes
canvas = (
    Canvas()
    .font_family("Oswald-VariableFont_wght.ttf")
    .font_size(80)
    .font_weight(FontWeight.BLACK) # Sets 'wght' axis to 900
    .color("orange")
)

canvas.render("Variable Font").save("variable_font.png")

FontWeight can be an enum member (e.g., FontWeight.BOLD) or an integer from 100 to 900.
Text Shaping
PicTex includes advanced text shaping capabilities that improve text rendering quality through kerning, ligatures, and complex script support. This feature is automatically enabled and works behind the scenes to provide professional typography.
Kerning
Kerning automatically adjusts the spacing between specific character pairs for better visual balance. For example, characters like "AV", "TY", or "Wo" will have optimized spacing.
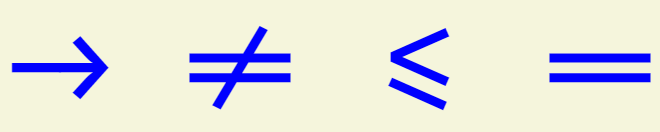
Ligatures
When using fonts that support ligatures, character sequences are automatically replaced with single, specially designed glyphs for improved readability.
from pictex import Canvas, NamedColor

(
    Canvas()
    .font_family("FiraCode-Medium.ttf")
    .font_size(100)
    .background_color(NamedColor.BEIGE)
    .color(NamedColor.BLUE)
    .render("-> != <= ==")
    .save("ligature.png")
)
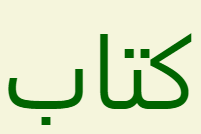
Complex Script Support
Text shaping properly handles complex scripts like Arabic, where characters need to connect and change forms based on their position.
from pictex import Canvas, NamedColor

(
    Canvas()
    .font_size(100)
    .background_color(NamedColor.BEIGE)
    .color(NamedColor.DARKGREEN)
    .render("كتاب")
    .save("docs-arabic.png")
)
Complex Emoji Sequences
Multi-part emoji sequences (like 👩🔬) are rendered as single glyphs instead of separate emoji characters.

Multi-line Text and Alignment
PicTex fully supports multi-line text using newline characters (\n). Additionally, text can automatically wrap when placed in containers with fixed widths.
.text_align(): Controls how text lines are aligned within the text block. AcceptsTextAlign.LEFT,TextAlign.CENTER, orTextAlign.RIGHT. If not set, it defaults toLEFTin LTR contexts andRIGHTin RTL contexts..line_height(): Sets the spacing between lines as a multiplier of the font size. A value of1.5means 150% spacing. When not set, the default is"auto": each line's vertical space is derived from the font's own metrics (ascent + descent + leading), similar to CSSline-height: normal. To replicate the previous behavior of tightly packed lines, call.line_height(1.0)explicitly..text_wrap(): Controls whether text automatically wraps to fit container width. Accepts"normal"(default, wrapping enabled) or"nowrap"(wrapping disabled)..text_box_edge(): Controls how the top and bottom edges of the text bounding box are calculated. Inspired by the CSStext-box-trim/text-box-edgeproperties. Accepts"font"(default - uses font ascent/descent metrics, stable regardless of content) or"glyphs"(uses the actual ink bounds of the rendered characters, tightly wrapping visible glyphs). This property is inherited.
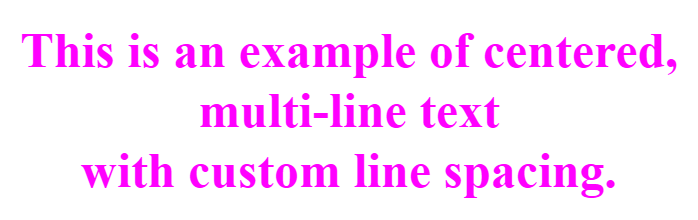
from pictex import Canvas, TextAlign

canvas = (
    Canvas()
    .font_family("Times New Roman")
    .font_weight(700)
    .font_size(50)
    .color("magenta")
    .text_align(TextAlign.CENTER)  # a string is also accepted ("center")
    .line_height(1.2)
    .padding(20)
)

text = "This is an example of centered,\nmulti-line text\nwith custom line spacing."
canvas.render(text).save("alignment_example.png")
Text Box Edge
By default, PicTex sizes a text node's bounding box using the font's ascent and descent metrics. This is stable and predictable - the box height is always the same for a given font size, regardless of which characters are rendered.
Use .text_box_edge() when you need the box to tightly wrap the actual visible ink, for example to remove the extra space above capital letters or below the baseline when no descenders are present.
from pictex import Canvas, Column, Text

def example_text():
    return Text("Hello").background_color("lightgray").border(10, "red")

canvas = Canvas().font_family("Arial").font_size(80).background_color("pink")

layout = Column(
    example_text().text_box_edge("glyphs"),
    example_text().text_box_edge(bottom="glyphs", top="font"),
    example_text().text_box_edge(bottom="font", top="glyphs"),
    example_text().text_box_edge("font"),
).gap(10)

canvas.render(layout).save("text_box_edge.png")
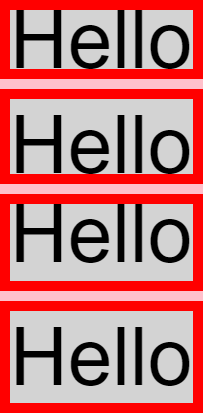
Caution:
"glyphs"makes the box size content-dependent. Different strings will produce different heights, which can cause your layout to shift unexpectedly. Use"font"(the default) for dynamic or user-supplied text.
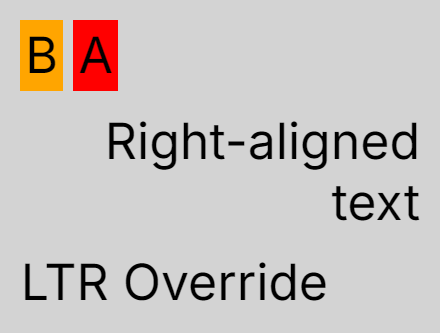
Text Direction (LTR / RTL)
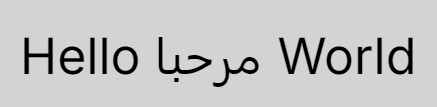
PicTex automatically applies the Unicode Bidirectional Algorithm (BiDi) to all text, ensuring proper visual ordering of mixed-direction content without any configuration required. It also replicates CSS-compliant layout behavior for RTL contexts.
- Automatic BiDi Processing: The BiDi algorithm runs automatically on every text element, properly reordering characters in mixed scripts (e.g., English + Arabic). This includes correct positioning of punctuation: in RTL,
"Hello!"visually becomes"!Hello". - Manual Direction Override: Use
.direction("rtl")or.direction("ltr")to set an explicit base paragraph direction. - Automatic Alignment Resolution: In an RTL context,
text_align()automatically defaults toTextAlign.RIGHTif not explicitly set, ensuring text aligns correctly with the paragraph flow. - Layout Mirroring:
Rowcontainers automatically reverse the visual order of their children whendirection("rtl")is applied, mirroring the behavior ofdirection: rtlin CSS Flexbox. - Direction Inheritance: The direction property is inherited by all children within a container.
from pictex import Canvas, Row, Column, Text

# Automatic BiDi - no direction needed
# Arabic text is automatically reversed
Canvas().background_color("lightgray").padding(20).render("Hello مرحبا World").save("auto_bidi.png")

# RTL base direction - affects alignment and layout
container = (
    Column(
        # This Row will be mirrored: [B] [A]
        Row(
            Text("A").background_color("red").padding(5),
            Text("B").background_color("orange").padding(5),
        ).gap(10),

        # This text will be right-aligned automatically
        Text("Right-aligned text").size(width=400),

        # Explicit override to LTR
        Text("LTR Override").direction("ltr"),
    )
    .direction("rtl")
    .padding(20)
    .gap(20)
    .background_color("lightgray")
)

Canvas().render(container).save("direction_example.png")
Automatic BiDi result:
RTL direction result:
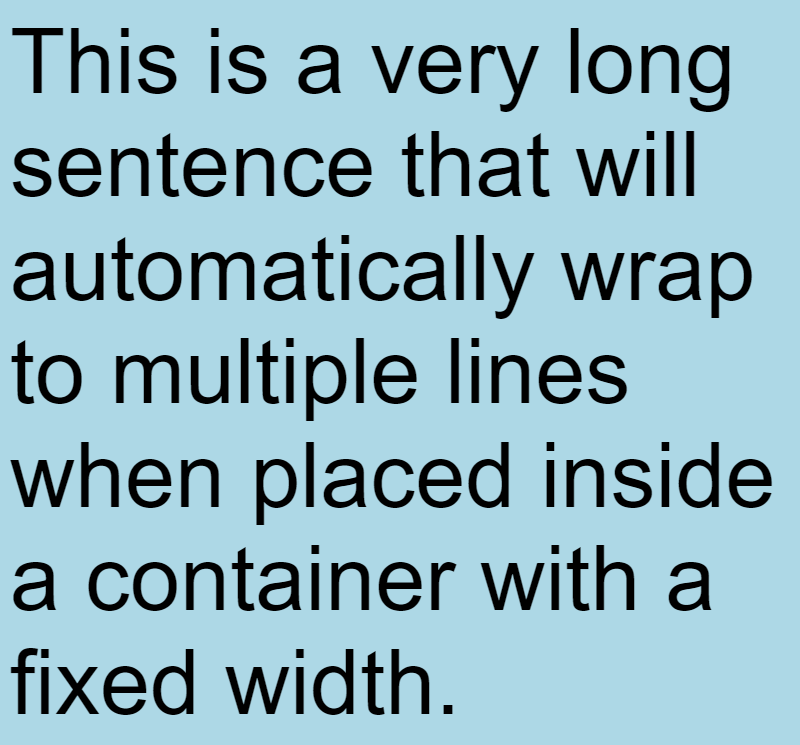
Text Wrapping
When text is placed inside containers with fixed widths, it can automatically wrap to multiple lines:
from pictex import Canvas, Column

canvas = Canvas().font_family("Arial").font_size(90)

# Text will automatically wrap to fit the 800px width
long_text = "This is a very long sentence that will automatically wrap to multiple lines when placed inside a container with a fixed width."
container = Column(long_text).size(width=800).padding(10).background_color("lightblue")

canvas.render(container).save("text_wrapping_example.png")
You can also disable text wrapping:
# This text will not wrap and may overflow the container
no_wrap_text = Text(long_text).text_wrap("nowrap")
container = Column(no_wrap_text).size(width=800).padding(10).background_color("lightblue")
Inline Spans (Rich Text)
You can use the Span builder inside a Text element to apply granular styling to specific portions of your text.
A Span exposes all the typographical properties (like .color(), .font_size(), .font_weight(), .underline(), .text_stroke(), etc.) and seamlessly integrates with the surrounding text flow, honoring multi-line wrapping and bidirectional (RTL) algorithm.
from pictex import Canvas, Text, Span, LinearGradient

gradient = LinearGradient(colors=["purple", "orange"])

canvas = Canvas().font_size(80)

# Nested spans inherit properties from their parent spans naturally
rich_text = Text(
    "This is ",
    Span(
        "very ",
        Span("rich").font_weight("bold").color(gradient),
        " text!"
    ).color("blue").underline(thickness=4)
)

canvas.render(rich_text).save("span_example.png")
Spans fully support:
- Nested Inheritance: Deeply nested spans inherit their parent's properties (like color or font_size) unless explicitly overridden.
- Continuous Gradients & Decorations: Gradients and underlines applied to a Span will smoothly cover the span's entire footprint, even if it wraps across multiple lines or breaks into multiple font fallbacks (like Emojis).
- Contextual Joining: Complex scripts like Arabic maintain their perfect contextual shape across span color boundaries.
Text Decorations
You can add underline and strikethrough decorations. As shown in the Gradients guide, the color for a decoration can also be a LinearGradient.
If the color is not defined, it will use the font color.
from pictex import Canvas

# Simple underline
canvas1 = Canvas().font_size(80).color("blue").underline(10)
canvas1.render("Underlined").save("underline.png")

# Styled strikethrough
canvas2 = Canvas().font_size(80).color("blue").strikethrough(thickness=10, color="red")
canvas2.render("Strikethrough").save("strikethrough.png")


Text Shadows
Applies one or more shadows directly to the text glyphs. To add multiple shadows, pass multiple Shadow objects. This method is declarative and will override any previous text shadows.
A Shadow instance has:
- offset: A tuple (x, y) for the shadow's position.
- blur_radius: The amount of blur to apply.
- color: The color of the shadow.
from pictex import Canvas, Text, Shadow

canvas =(
    Canvas()
    .font_size(120)
    .font_family("Impact")
    .color("#00FFAA")
    .text_shadows(
        Shadow(offset=(0, 0), blur_radius=2, color="#00FFAA"),
        Shadow(offset=(0, 0), blur_radius=5, color="#FFFFFF")
    )
)
canvas.render("NEON").save("neon.png")

Outline Stroke
The .text_stroke() method adds a stroke around the text.
By default, it follows CSS standards where the stroke is centered on the text path (half inside, half outside). You can control the stroke rendering with the mode parameter:
"center"(default): CSS-compliant centered stroke"outline": Stroke only outside the text (prevents thinning at large widths)"inline": Stroke only inside the text
from pictex import Canvas

# Default CSS-compliant stroke
canvas = (
    Canvas()
    .font_size(150)
    .font_family("Impact")
    .background_color("beige")
    .color("yellow")
    .text_stroke(width=7, color="black")
)

canvas.render("COMIC").save("comic_style.png")